Tighten loose screws by using the right driver, correct torque, and thread repair when needed.
I have spent years fixing furniture, appliances, and home projects, so I know how to tighten loose screws properly without causing damage. This guide walks you through tools, step-by-step methods, fixes for stripped threads, when to replace fasteners, and simple prevention tips. Read on for clear, practical advice you can use today to stop squeaks, prevent failures, and extend the life of your items.

Why screws become loose
Screws back out for a few common reasons. Vibration shakes them loose over time. Wood or plastic can compress and create gaps. Thermal expansion and contraction can also loosen threaded joints. Using the wrong driver or overtightening can strip threads and reduce holding power. Knowing the cause helps you choose the right fix for how to tighten loose screws properly.

Tools and materials you'll need
Gather the right items before you start. Good tools make the job faster and safer.
- Screwdrivers or bits that match the screw head to avoid cam-out.
- A torque screwdriver or driver with adjustable clutch for sensitive parts.
- Thread repair options: threadlocker, toothpicks or wooden matchsticks, wood glue, helicoil kits, and replacement screws.
- Small clamps or vise to hold parts steady.
- Cleaning brush and penetrating oil for rusty screws.
- Safety glasses and gloves when working on power tools or overhead items.
Having the correct driver and replacement parts is essential to learning how to tighten loose screws properly.

Step-by-step: how to tighten loose screws properly
Follow these steps for a reliable fix. Keep your motions steady and avoid forcing a stripped driver.
-
Inspect the screw and area
- Check the head, shaft, and surrounding material.
- Note if the screw is loose from vibration, stripped threads, or damaged material.
-
Choose the right driver and bit
- Match the driver to the screw head type and size.
- Use a new, snug-fitting bit to reduce slipping.
-
Clean and align the joint
- Remove dirt, grease, or rust.
- Bring parts into proper alignment and clamp if needed.
-
Tighten with controlled torque
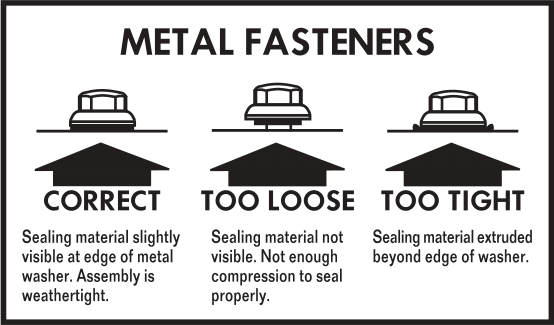
- Turn slowly until snug. For sensitive materials, use small increments.
- Stop when you feel solid resistance; avoid overtightening.
-
Use threadlocker or mechanical backup if needed
- Medium-strength threadlocker prevents vibration loosening but allows future removal.
- For high-vibration areas, use a lock washer, nylon-insert lock nut, or double-nut.
-
Repair stripped threads if necessary
- For wood: push in a wooden matchstick or toothpick with wood glue, break off excess, then reinsert screw.
- For metal: use a helicoil or larger-size tap-and-die repair. Replace screw if damaged.
-
Re-check after use
- Test the fixed item under normal conditions. Check screws after a day or two and again after a few weeks.
These steps form a practical blueprint for how to tighten loose screws properly in most household and DIY contexts.

Fixes for stripped screws and damaged threads
Stripped screws and threads need careful repair to restore holding power.
-
Stripped screw head
- Use a screw extractor kit or left-handed drill bit. Clamp the item to prevent spinning.
- If the head is accessible, try a rubber band for grip under the bit as a temporary aid.
-
Stripped wood threads
- Use wood glue and toothpicks or a matchstick to fill the hole, then reinsert the screw.
- For bigger holes, drill a larger pilot and use a larger screw or an insert.
-
Stripped metal threads
- Tap and install a helicoil insert for a lasting repair.
- For light damage, a slightly larger bolt or threadlocker with a new screw may work.
-
Prevent repeat damage
- Replace screws showing wear. Use hardened or coated screws for metal or outdoor use.
- When in doubt, replace both screw and mating hardware.
Knowing these fixes helps you learn how to tighten loose screws properly without creating bigger problems.
When to replace screws, use anchors, or call a pro
Knowing limits saves time and risk.
- Replace screws when heads or shafts are rounded, bent, or corroded.
- Use wall anchors or toggle bolts when screws pull out of drywall or hollow materials.
- Consider plastic or metal inserts for loose cabinet or furniture joints.
- Call a professional if structural fasteners, roof connections, or safety-critical hardware are involved. Improper fixes there can be dangerous.
These guidelines help you decide when simple tightening is enough and when a stronger solution is needed for how to tighten loose screws properly.
/how-to-fix-a-loose-lever-door-handle-5222471-04-c0aea79eebf642e1bb378dd872b68742.jpg)
Prevention and maintenance tips
Routine care keeps screws tight longer.
- Check high-vibration items monthly for the first few months after repair.
- Use threadlocker or lock washers on motors, appliances, and outdoor items.
- Choose screws of correct length and grade for the job.
- Pre-drill proper pilot holes in wood to reduce splitting and ensure correct thread engagement.
- Keep tools in good shape so bits fit screws snugly.
Small habits reduce how often you need to fix loose screws and improve the lifetime of your items.

Common mistakes to avoid
Avoid these frequent errors to prevent damage.
- Using the wrong driver size, which strips heads and wastes time.
- Overtightening until material cracks or threads strip.
- Reusing badly worn screws instead of replacing them.
- Ignoring the cause of looseness and only tightening repeatedly.
- Skipping safety gear when working overhead or with power tools.
Learning what not to do is part of how to tighten loose screws properly and safely.
Frequently Asked Questions of how to tighten loose screws properly
How tight should a screw be?
Tighten until parts are secure and there is firm resistance. Avoid overtightening; for wood, stop when the head sits flush or slightly recessed. For metal, use specified torque if available.
Can I reuse screws after removing them?
You can reuse screws if the head and threads are in good condition. Replace screws that are corroded, bent, or have rounded heads for reliable holding.
Will threadlocker make screws permanent?
Threadlocker comes in different strengths. Medium-strength formulas allow future removal with normal tools. High-strength formulas can be permanent and may need heat or special tools.
How do I fix a screw that keeps coming loose?
Identify the cause: vibration, worn threads, or poor material. Use threadlocker, lock washers, or upgrade to an insert or larger fastener to stop recurring loosening.
Is it safe to tighten screws with a power drill?
Yes, if you use low torque and the correct bit. Set the clutch or work in short bursts. For delicate materials, use a manual driver or torque-limited tool to avoid damage.
When should I call a professional for loose screws?
Call a pro for structural, roof, or safety-critical fasteners. Also seek help if you cannot access the fastener, or if fixing it risks damaging important equipment.
Conclusion
Tightening screws well means choosing the right tool, matching technique to the material, and fixing root causes like vibration or stripped threads. Start with inspection, use correct drivers, apply threadlocker or inserts when needed, and replace damaged fasteners. Take action today: check key items in your home, make simple repairs, and subscribe or comment if you want a tool checklist or step-by-step video. Implement these tips to keep things safe, quiet, and working longer.