The best way to reduce tool setup time is to prepare tools and materials in advance, standardize setup steps, organize accessories, and measure every changeover. These actions reduce downtime, limit errors, and help workers complete more useful work without rushing or reducing safety.
In American woodworking shops, machine shops, construction workshops, and repair facilities, tool setup can take a large part of the workday. A worker may need to change a saw blade, adjust a fence, install a router bit, or prepare a drilling station. Each task takes time. Repeated delays can reduce the amount of useful work completed during a shift.
Tool setup time is not only the time spent changing an accessory. It also includes finding tools, checking parts, cleaning work areas, setting machine controls, and testing the first result. Poor planning can turn a simple change into a long stop. A clear setup process helps workers avoid these delays.
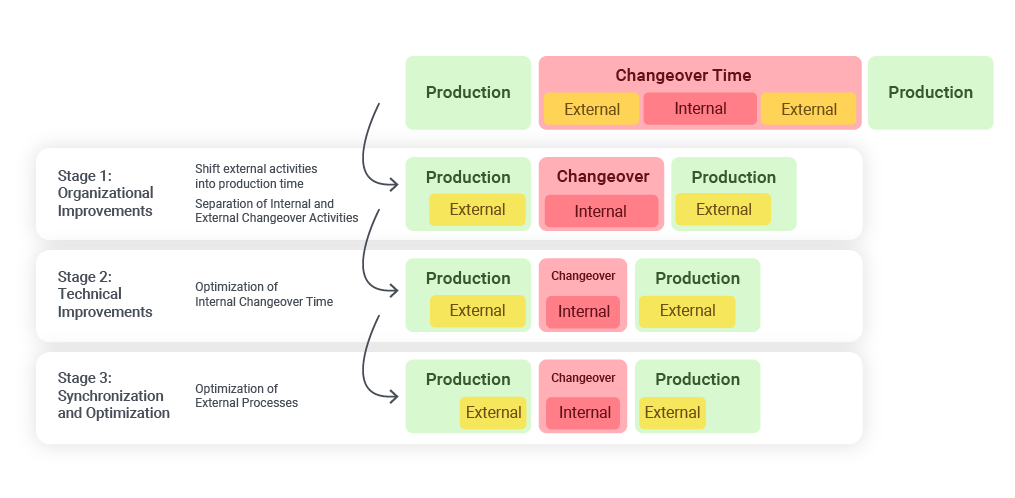
A useful improvement method is Single-Minute Exchange of Die, often called SMED. This method separates tasks that need stopped equipment from tasks that can be done before a changeover. It then makes the remaining steps simpler. The goal is not to rush a worker. The goal is to remove wasted motion and avoidable waiting.
This guide applies these ideas to American workshops, professional tool users, and production teams. It covers fixed machines, portable power tools, and shared work areas. The process guidance is based on established changeover methods and published safety requirements. The examples and calculations are illustrative, not results from hands-on testing.
Source: anebonmetal.com
What Tool Setup Time and Changeover Mean
Tool setup time is the time needed to prepare a tool, machine, or work area for a task. It starts with the work needed to get ready and ends when the tool is ready to produce a safe and acceptable result. The exact steps depend on the tool and the job.
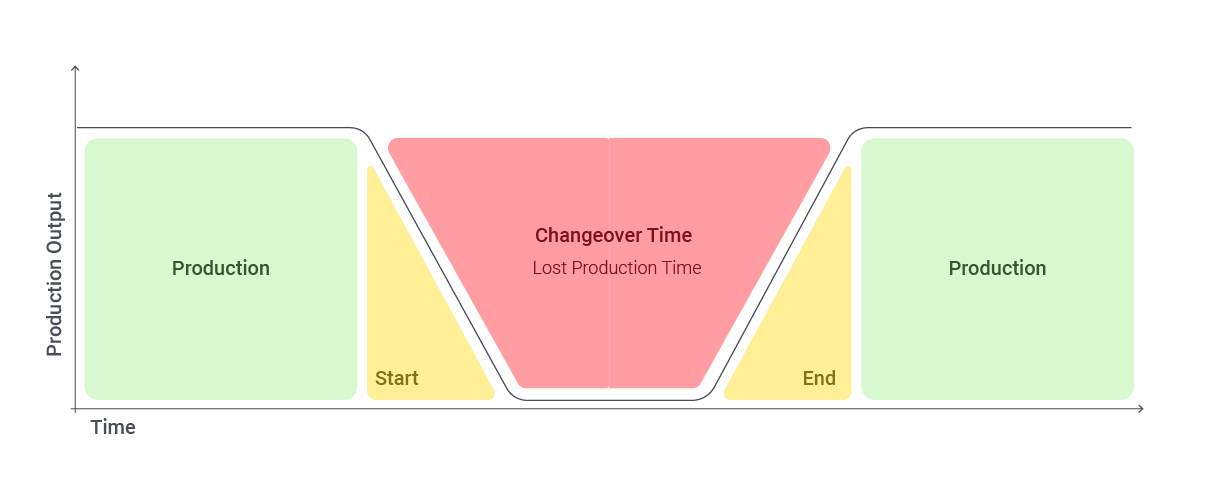
Changeover time is the time needed to switch from one task, product, material, or tool setup to another. A cabinet shop may change from cutting plywood to trimming solid wood. A metal shop may change a machine from one part size to another. A contractor may switch from drilling to fastening.
These terms are related, but they do not always mean the same thing. A first setup may prepare a machine at the start of a shift. A changeover prepares it for a different task after work has already begun. Both can affect daily output.
A good measurement must include more than the time spent holding a wrench. It should include searching, waiting, cleaning, adjustment, inspection, and the time needed to make the first acceptable result.
Source: onetracker.in
Tool preparation
Gather the main tool, accessories, work instructions, materials, and safety equipment before work begins.
Machine adjustment
Set the required height, depth, speed, angle, fence, guide, or fixture according to the task and manufacturer instructions.
Accessory change
Remove and install the correct blade, bit, wheel, cutter, sanding pad, or other approved accessory.
First-run check
Inspect the first cut, hole, joint, or finished part before normal production continues.
Separate Setup Time From Actual Working Time
Setup time prepares the process. Working time creates the product or completes the job. Downtime is the period when a machine or work process cannot perform its planned task.
A machine may be ready while the operator still needs to move materials. A worker may also be ready while the machine needs adjustment. Record these delays separately when possible. This makes the real cause easier to find.
Elapsed time
The total time from the agreed start point to the agreed ready point.
Labor time
The total worker time used during setup. Two workers preparing a task for ten minutes use twenty labor minutes.
Production downtime
The time when equipment cannot perform its planned production task.
Define a Successful Changeover
A successful changeover does more than make a machine start. It puts the right tool and accessory in place, confirms the settings, and produces an acceptable first result.
For a production machine, a useful finish point is the first good part from the next run. For a portable tool, it can be the first safe and correct operation. This avoids counting an incomplete setup as a productivity gain.
Measure Current Setup Time Before Making Changes
Start with a clear record of the current process. A team cannot know whether a change worked if it does not know how long the old process took. A simple time study can reveal delays that workers may have accepted as normal.
Choose one machine or tool group with frequent setup changes. Record several normal changeovers across different days or shifts. Include the usual workers and task types. Do not select only the fastest or easiest examples.
Watch the full process from start to finish. Record every action, delay, search, adjustment, and test. Ask workers why they follow each step. Some steps may be required for quality or safety, while others may exist only because the work area is poorly arranged.
Use a written checklist or a simple spreadsheet. A phone video may also help when workplace rules allow it. Get permission before recording workers. Protect private information and do not let recording interfere with safe work.
Source: mas-tools.de
Record the task
Name the machine, tool, accessory, material, job type, operator, and work shift.
Record the time
Measure each setup step and the total time. Use the same start and finish rules for every trial.
Record interruptions
Note missing accessories, tool searches, waiting for help, cleaning, repairs, and material delays.
Record quality
Track setup errors, rejected parts, extra adjustments, and rework after the change.
Record safety issues
Note blocked access, poor lifting positions, damaged cables, missing guards, and other hazards.
Build a Simple Setup Time Baseline
Use the median setup time as a useful starting point when results vary. The median is the middle value after all recorded times are placed in order. It can give a clearer picture than one unusually fast or slow result.
For example, imagine a workshop records five changeovers that take 28, 31, 35, 32, and 44 minutes. The median is 32 minutes. The 44-minute result should still be reviewed because it may reveal a delay that needs attention.
Baseline time
The normal time needed to complete the current setup.
Time variation
The difference between fast, normal, and slow changeovers.
Main delay
The step that causes the most waiting or repeated work.
Find the Biggest Sources of Lost Time
Look for repeated delays rather than blaming individual workers. A missing drill bit may cause a short delay once. If the same bit is missing every day, the storage system is the real problem.
Search time, poor labels, worn accessories, unclear instructions, and repeated machine adjustments are common areas to review. Fix the cause instead of asking workers to move faster.
Apply the SMED Method to Reduce Changeover Time
SMED is a practical method for reducing equipment changeover time. The name means Single-Minute Exchange of Die. Its single-digit target refers to a changeover of less than ten minutes. This is a method goal, not a rule that every workshop must meet.
The method is linked to the work of industrial engineer Shigeo Shingo. Its main idea is simple. Separate work that must happen while equipment is stopped from work that can happen before or after the stop. Then reduce the number and length of the steps that remain.
The method works best when teams study the real process. Do not copy a setup plan from another machine without checking the design, tool limits, and safety rules. A small workshop can use the same thinking without a large production system.
Source: mas-tools.de
Separate
List each setup step and identify whether it must happen during machine downtime or can happen outside it.
Convert
Move suitable preparation tasks outside the downtime period. Make other tasks external only when the machine design and safety rules allow it.
Simplify
Reduce extra movements, repeated measurements, loose fasteners, and unnecessary adjustments.
Standardize
Write the improved method as a clear sequence that trained workers can follow.
Step 1: Separate Internal and External Tasks
Internal tasks require the machine to be stopped. Examples may include changing a machine fixture, replacing a cutter, or adjusting a component inside a protected work area.
External tasks can be completed before or after the machine stop. Examples may include checking the next job sheet, collecting the correct accessories, preparing approved fixtures, and inspecting the next material batch.
The key is to check each task before moving it. A task is not safe to perform during machine operation just because it seems quick. Follow the equipment manual and the applicable safety procedure.
Step 2: Move Safe Preparation Outside Downtime
Prepare the next tool kit while the current job is running, if the work can be done in a safe and separate area. Check the next accessory for the correct size, type, condition, and machine fit. Keep the kit ready for the planned change.
A second worker may prepare materials while the operator finishes the current task. This can reduce waiting. However, each person must have a clear role and safe access to the work area.
Prepare accessories
Gather the next approved blade, bit, cutter, sanding disc, or other required item.
Prepare work instructions
Confirm dimensions, material, settings, and quality needs before the change begins.
Prepare the work area
Stage approved supports, clamps, gauges, and materials in a clear location.
Step 3: Simplify the Steps That Remain
Review every step that still needs the machine to stop. Look for repeated measuring, difficult access, loose parts, and unclear tool positions. A better layout can remove many small delays.
Use approved quick-change systems where they suit the equipment. Preset stops, marked adjustment points, standard fasteners, and dedicated holders can reduce setup effort. Never remove a required guard or change a machine design without proper approval.
Reduce adjustment steps
Use verified reference marks or preset fixtures when the machine manufacturer permits them.
Improve access
Place approved tools and fasteners where the worker can reach them without awkward movement.
Remove repeated checks
Use a clear setup sheet to avoid measuring the same item several times.
Step 4: Standardize the Improved Method
Write each setup step in the correct order. Use short instructions and clear labels. Add the correct tool and accessory details where different models need different settings.
Train workers on the new method. Ask them to follow it during normal work and report any problem. Review the process again if setup time rises or quality falls.
Create an Organized Tool Staging and Setup System
A well-planned staging area reduces the time workers spend looking for tools. It also lowers the chance of using the wrong accessory. Each common task should have a clear place for its main tools and support items.
Use a tool cart, storage cabinet, wall board, or labeled kit system. The best choice depends on the size of the shop and the type of work. A fixed machine may need a dedicated setup cart. A mobile crew may need a portable kit that travels between work areas.
Keep frequently used items near the point of use. Store less common items in a separate area. Do not block walkways, emergency exits, electrical panels, or machine access with storage equipment.
Source: anebonmetal.com
Use task-based kits
Group the tools and accessories needed for common jobs. A drilling kit may include approved bits, a chuck key if required, depth stops, and measuring tools.
Label storage clearly
Use readable labels for tool types, sizes, and storage locations. Keep similar-looking accessories in separate marked spaces.
Use shadow boards
Give common hand tools a marked storage position. Missing tools become easier to spot.
Keep consumables ready
Check sanding discs, blades, bits, fasteners, and other common supplies before a job starts.
Separate damaged items
Place worn or damaged tools in a marked hold area. Do not return unsafe items to active storage.
Apply Simple 5S Principles
The 5S method helps teams keep work areas clean and easy to use. It uses five ideas: sort, set in order, shine, standardize, and sustain.
First, remove items that the work area does not need. Next, give useful tools a clear home. Clean the area and set a simple standard for how it should look after each job.
The final step is to keep the system in use. A labeled shelf does not help if workers place tools anywhere after a shift. Short daily checks can help maintain the system.
Build a Standard Tool Setup Checklist
A checklist helps workers avoid missed steps. Keep it short enough to use during normal work. Change it when the tool, job, or safety needs change.
The checklist should match the actual equipment. Do not use one general sheet for every saw, drill, router, or machine if their setup steps differ.
Before setup
Confirm the job, tool, accessory, material, and required safety controls.
During setup
Check fit, adjustment, support, guards, and approved settings.
Before use
Inspect the setup and perform the required test or first-run check.
After use
Clean, inspect, return, and record tools that need service.
Optimize Setup for Different Types of Tools
Different tools need different setup methods. A table saw has different needs from a drill press or a portable impact driver. A good system should match the tool, the material, and the task.
Start with the tools that have frequent changes. Look for repeated blade swaps, bit changes, fence adjustments, fixture changes, and cleaning tasks. Build a separate standard process for each common setup.
Source: onetracker.in
Table saws
Prepare the correct approved blade, inspect the work support, and confirm the fence and guard setup before the next task.
Routers
Prepare the correct cutter and guide system. Check the shank fit, depth, speed guidance, and work support.
Planers
Prepare the material and check the required depth and feed settings. Keep the infeed and outfeed areas clear.
Drill presses
Prepare the correct bit, workholding method, depth setting, and speed guidance for the material.
Woodworking shops often switch between several materials and cutting tasks. A table saw may handle sheet goods, hardwood, and trim during the same shift. Each change may need a different blade, fence position, or work support.
Group jobs that use similar safe machine settings when the work plan allows it. Prepare the next blade and measuring tools before the current run ends. Keep blade storage organized so workers can identify the correct type without opening several boxes.
Check dust collection before starting the next task. A blocked hose or missing adapter can stop work after the machine is ready. Include dust hoses and fittings in the setup plan.
Reduce Setup Delays for Construction and Field Crews
Field crews face a different problem. They may move tools between rooms, floors, vehicles, and outdoor work areas. Missing accessories can cause repeated trips to the truck or storage area.
Use mobile tool kits based on the work planned for the day. Keep common bits, batteries, measuring tools, approved blades, and safety items in known locations. Check the kit before leaving the shop or vehicle.
At the work site, stage tools in a safe area close to the task. Keep cords and hoses away from walk paths. Secure tools during transport and follow the rules for each site.
Use Preset Tools and Fixtures Where Suitable
Preset tools and fixtures can reduce repeated setup work. A machine operator may prepare an approved fixture away from the machine while production continues. A woodworking team may use a verified stop block for repeat cuts.
These methods only help when they maintain accuracy and safe tool use. Check the fixture against the actual material and machine. Review any change that could affect cutting force, tool clearance, or workpiece support.
Plan Work to Reduce Unnecessary Tool Changes
Good scheduling can reduce the number of changeovers in a shift. When a shop groups compatible jobs, workers may avoid repeated changes to the same machine. This can save time without changing the tools or buying new equipment.
Review the daily work list before assigning tasks. Look for jobs that use the same blade type, bit size, fixture, or material setup. Place compatible jobs near each other when delivery needs and quality rules allow it.
Do not make batches larger than the work requires. Long runs may reduce changeovers, but they can also create excess stock, storage needs, and longer waits for other jobs. The best schedule balances setup effort with customer demand and available space.
Source: mas-tools.de
Group compatible jobs
Place tasks with similar tool and machine settings together when doing so does not delay urgent work.
Prepare the next task early
Use the current production period to check instructions and stage approved items for the next job.
Assign clear roles
Give each worker a clear setup or production duty. Avoid having two people search for or handle the same item.
Protect the main work area
Keep staging work away from moving equipment, vehicle routes, and other active hazards.
Use Parallel Preparation With Care
Parallel preparation means that suitable tasks happen at the same time. One worker may finish a production run while another checks the next job kit. This can reduce the wait between jobs.
Parallel work needs clear communication. Workers must know who controls the machine and who is preparing the next task. Never allow preparation work to expose someone to a moving part or an unexpected start.
Plan Around the Bottleneck
A bottleneck is the machine or work step that limits the output of the full process. Reducing setup time at that point may help the whole shop. Reducing setup time at a machine with spare capacity may have less effect.
Review where jobs wait and where work builds up. Focus improvement efforts on the tool or machine that holds up the next step. Keep enough work ready to use the saved time, but avoid making stock without a clear need.
Measure Productivity Gains and Calculate Time Savings
A shorter setup can create more available work time. However, a lower setup time does not always mean higher output. The saved time must be used by a process that has enough work, materials, labor, and capacity.
Track the old and new setup times. Also record labor time, rejected work, rework, machine stops, and safety issues. These measures show whether the change improved the full process or only made one step faster.
Use a simple percentage formula to measure the change. Subtract the new setup time from the old setup time. Divide the result by the old setup time and multiply by 100.
Setup time reduction
Formula: (Old setup time minus New setup time) divided by Old setup time, multiplied by 100.
Time saved per changeover
Formula: Old setup time minus New setup time.
Weekly time saved
Formula: Time saved per changeover multiplied by the number of changeovers per day and the number of workdays.
Example: Calculate a Changeover Improvement
Imagine a U.S. woodworking shop that takes 32 minutes to change a machine setup. After improving tool staging and setup steps, the new changeover takes 19 minutes. These are hypothetical figures used to show the calculation.
The shop saves 13 minutes per changeover. The percentage reduction is about 40.6 percent. This means the new setup takes less time than the old one, while the shop still needs to confirm that quality and safety remain the same.
Now assume the machine has four changeovers each workday and operates five days per week. The shop saves 52 minutes per day. Across five days, that equals 260 minutes, or 4 hours and 20 minutes per week.
Old setup
32 minutes per changeover.
New setup
19 minutes per changeover.
Time saved
13 minutes per changeover.
Reduction
13 divided by 32, multiplied by 100, equals about 40.6 percent.
Weekly savings
13 minutes multiplied by four daily changes and five workdays equals 260 minutes.
Turn Saved Time Into Useful Capacity
The saved 4 hours and 20 minutes do not automatically become extra production. The shop must have enough demand and available resources to use that time. Material shortages, machine faults, or delays at another work step may limit the result.
A contractor may use saved setup time to finish more work during the same shift. A production shop may use it to reduce waiting or handle smaller job batches. A repair team may use it to complete inspections and planned maintenance.
More available production time
Use the saved time for planned work that was previously delayed.
Less waiting
Reduce the time that workers or other machines wait for the next setup.
Better job flow
Move work through the shop with fewer stops and less unnecessary movement.
A fast setup that causes poor cuts or damaged parts is not a good improvement. Compare the first acceptable result, not only the time needed to start the machine. Keep a record of quality and rework after each change.
For production equipment, overall equipment effectiveness may help teams review availability, performance, and quality. It should be used with clear data. Do not claim an improvement in total equipment effectiveness from setup time alone.
Avoid Common Setup and Changeover Mistakes
Some changes look faster at first but create new problems later. Workers may skip checks, store tools in unsafe places, or use an accessory that does not fit the machine. These choices can increase risk and repair costs.
Review the full process before approving a new setup method. Ask workers to report problems during the trial. Keep the steps that improve speed without reducing tool control, accuracy, or safety.
Rushing the setup
Skipping inspections or checks can lead to poor results and unsafe operation. Keep all required steps.
Moving every task outside downtime
Some work cannot be done safely while a machine is running. Classify each task based on the real hazard and equipment design.
Using the wrong accessory
A fast accessory change has no value if the blade, bit, wheel, or cutter is not approved for the tool and job.
Buying storage before studying the problem
New carts and cabinets may not solve poor work planning. First find out why tools are hard to locate.
Ignoring worker feedback
Workers who perform the setup may know about problems that a written process does not show.
Failing to review the new method
A setup method can become outdated after a machine, accessory, or work process changes.
Use the Correct Tool and Accessory
Check the accessory size, connection, speed rating, and intended material. Follow the tool maker’s instructions. Do not assume that two accessories fit because they look alike.
Inspect blades, bits, discs, clamps, and power leads before use. Remove damaged items from service. Use the correct replacement part and approved fitting method.
Do Not Trade Safety for a Shorter Changeover
Safety controls must stay in place during every setup improvement. Never bypass a guard, defeat an interlock, or reach into a danger zone to save time. Stop the work if the setup creates an unsafe condition.
In covered U.S. general-industry workplaces, OSHA regulation 29 CFR 1910.147 addresses the control of hazardous energy during covered servicing and maintenance. It can apply to tool changes and adjustments when unexpected startup or released energy could injure a worker.
The rule has defined scope and exceptions. It excludes construction employment and certain other activities. It also has a limited exception for certain routine, repetitive, and integral minor servicing during normal production when effective alternative protection is used. A short task is not automatically exempt.
For covered work, employers must use the required energy control program and procedures. Workers must understand the energy sources and the approved isolation steps. Follow the applicable OSHA rules, state requirements, employer procedures, and equipment instructions.
Control energy
Identify electrical, mechanical, pneumatic, hydraulic, thermal, and other stored energy sources before covered servicing work.
Use approved isolation
Follow the required lockout or tagout procedure. A control switch alone may not isolate the energy source.
Check the work area
Remove loose items, confirm safe worker positions, and restore required machine guards before returning equipment to service.
Train the team
Only trained and authorized workers should perform tasks that require formal energy control procedures.
Create a Practical Tool Setup Improvement Plan
A small pilot is a good way to improve setup time without disrupting the whole shop. Choose one tool or machine that has frequent changes and clear delays. Work with the people who use it each day.
Start with the current process. Measure the setup time and record the main problems. Then make a few changes that address those problems. Test the new method under normal work conditions before using it as the new standard.
Keep the improvement process simple. A large project is not needed to move a tool cart, add clear labels, or create a setup checklist. Larger changes to machine fixtures or energy controls need the right technical review and approval.
Week 1: Observe and measure
Select one machine or tool group. Record several normal changeovers and identify the steps that take the most time.
Week 2: Plan the change
Separate internal and external tasks. Design a better tool kit, storage layout, and setup checklist.
Week 3: Test the new process
Train the team and test the revised steps. Record setup time, first-run quality, and any safety or workflow problems.
Week 4: Review and standardize
Compare the results with the baseline. Keep successful changes and revise steps that do not work as planned.
Set Clear Improvement Targets
Use a target that fits the actual problem. A shop with long tool searches may focus on storage time first. A machine with repeated adjustments may need preset fixtures or better instructions.
Do not choose a target only because another company reached it. The right goal should be realistic for the machine, task, worker skill, and quality needs.
Time target
Reduce the measured setup time without removing required steps.
Quality target
Maintain or improve the rate of acceptable first-run results.
Workflow target
Reduce searching, waiting, repeated handling, and unnecessary movement.
Safety target
Maintain all required guards, energy controls, work supports, and safe access.
Review Results With the Workers
Ask workers whether the new process is easy to follow. Check if the new storage layout works during a busy shift. Look for steps that still cause confusion or delays.
Use the feedback to update the checklist and training. A good process should work for trained workers across normal shifts. It should not depend on one person remembering every detail.
Next-Question Gap Map for Tool Setup Optimization
A useful guide should help readers with the next decision after they learn the basic setup method. The following gap map uses inferred next needs based on the practical steps in this article. These are not claimed to be verified Search Console queries or live People Also Ask results.
The comparison considers four reviewed resources: the Lean Enterprise Institute explanation of SMED, Lean Production’s practical SMED guide, the Lean Management Institute explanation, and OSHA’s hazardous-energy rule. Their coverage is useful, but readers of general tool setup guides also need examples for portable tools, small workshops, and field crews.
What counts as changeover time?
Reader stage: Before measurement. Basis: Inferred next need. Reviewed coverage: Answered by the Lean Enterprise Institute and Lean Production, which explain changeover measurement and setup steps. Reader benefit: A clear start and finish point makes time records more useful. Evidence: Established SMED measurement guidance. Priority: High. Placement: Definitions and measurement sections.
Which setup tasks can happen before a machine stops?
Reader stage: During planning. Basis: Inferred next need. Reviewed coverage: Answered at a general level by the SMED resources, but the limits of safe preparation need more practical explanation. Reader benefit: Helps workers reduce downtime without unsafe shortcuts. Evidence: Internal and external setup principles, equipment instructions, and applicable safety rules. Priority: High. Placement: SMED and safety sections.
How can a small shop reduce setup time without buying new machines?
Reader stage: Before investment. Basis: Inferred next need. Reviewed coverage: Shallow in the reviewed general SMED explanations for small workshop storage and portable tool kits. Reader benefit: Gives teams low-cost actions to test first. Evidence: Workflow analysis, point-of-use storage, and standard work principles. Priority: High. Placement: Tool staging and practical improvement plan sections.
How much time can a shop save each week?
Reader stage: After measurement. Basis: Inferred next need. Reviewed coverage: Lean Production provides changeover measurement guidance, while a clear small-shop weekly calculation is less developed in the reviewed material. Reader benefit: Helps managers estimate available capacity. Evidence: Arithmetic using recorded setup times and actual changeover frequency. Priority: High. Placement: Productivity calculation section.
Does every quick tool change require lockout or tagout?
Reader stage: Before performing the change. Basis: Inferred next need. Reviewed coverage: The SMED resources do not provide a full U.S. safety decision guide. OSHA’s rule provides the relevant general-industry requirements and defined exceptions. Reader benefit: Prevents workers from treating a short change as automatically safe or exempt. Evidence: 29 CFR 1910.147 and applicable machine safeguards. Priority: Critical. Placement: Safety section.
How should a field crew prepare tools before arriving at a job?
Reader stage: Before work starts. Basis: Inferred next need from the needs of mobile crews. Reviewed coverage: Not checked in the selected SMED pages. Reader benefit: Reduces missing accessories and repeated trips between the work area and vehicle. Evidence: Task-based kits, daily staging, and site-specific safety planning. Priority: Medium. Placement: Portable tool setup section.
Choose the Next Improvement Based on Its Impact
Start with the problems that cause the most lost time or safety risk. Do not add a new tool system just because it looks useful. First check whether a change in storage, planning, or work order can solve the problem.
If a problem needs machine-specific engineering or legal review, collect the equipment details and seek qualified help. Do not guess at a safe modification or a regulatory exception.
Frequently Asked Questions
Q
What Is the Best Way to Reduce Tool Setup Time?
Start by measuring the current setup process. Find the steps that cause the most searching, waiting, or repeated adjustment. Prepare safe items in advance, organize accessories, and create a standard setup checklist.
Use the SMED method to move suitable tasks outside machine downtime. Keep all required safety and quality checks in place.
Q
What Is the Difference Between Setup Time and Changeover Time?
Setup time is the time needed to prepare a tool, machine, or work area for a task. Changeover time is the time needed to switch from one existing task or production setup to another.
A first setup may happen at the start of a shift. A changeover usually happens when the next job needs a different tool, material, fixture, or machine setting.
Q
What Does SMED Mean in Tool Setup?
SMED means Single-Minute Exchange of Die. It is a method for reducing changeover time by separating internal tasks from external tasks, moving suitable preparation outside downtime, and simplifying the steps that remain.
The single-digit target is a method goal. It is not a required time for every tool change. The main aim is to reduce wasted time while keeping the work safe and accurate.
Q
Can Tool Setup Time Be Reduced Without Buying New Equipment?
Yes. Many improvements involve better planning and organization rather than new machines. Clear labels, task-based tool kits, preset instructions, organized storage, and a standard setup checklist can reduce delays.
Measure the main problem first. This helps a shop spend money only when a new cart, fixture, or accessory solves a real need.
Q
How Often Should a Workshop Review Its Setup Process?
Review setup steps when a tool, machine, accessory, material, or work process changes. Also review them when setup time rises, quality falls, or workers report repeated problems.
A short regular review can help keep the process useful. High-use machines may need more frequent checks than tools used only once in a while.
Q
Does Lockout or Tagout Apply to Every Tool Change?
Not every tool change has the same legal requirements. In covered U.S. general-industry workplaces, OSHA 29 CFR 1910.147 applies to covered servicing and maintenance when unexpected startup or released energy could cause injury.
The rule includes specific scope limits and exceptions. Workers should follow the employer’s energy control program, machine safeguards, and equipment instructions. Do not assume that turning off a machine or performing a quick change is enough.
✦ Wrapping Up
Conclusion
Tool setup time affects workshop output, labor use, and daily workflow. Poor storage, missing accessories, repeated adjustments, and weak planning can turn simple changes into long delays. A clear setup system helps reduce these losses.
Start with real measurements. Apply SMED principles to separate preparation from machine downtime. Build task-based kits, improve tool storage, and use standard checklists. Review each change for safety and quality before making it a permanent part of the process.
The best productivity gains come from a process that workers can repeat. Faster changeovers should create more useful work time, not more mistakes or risk. Small improvements can add up when teams measure results and keep the system in good order.
💡 Key Takeaway
Choose one frequently used tool or machine today. Record several normal setup times, list every step, and find the biggest source of delay. Prepare one improvement using safer tool staging or standard work. Test it, compare the results, and keep the change only if setup time improves without reducing quality or safety.