Miter saw gives precise crosscuts; circular saw offers portability and versatile ripping power.
I’ve built cabinets, framed walls, and cut trim for a living, so I know the strengths and limits of each tool. This guide breaks down miter saw vs circular saw with clear, practical advice. Read on to learn which saw fits your projects, budget, and skill level.
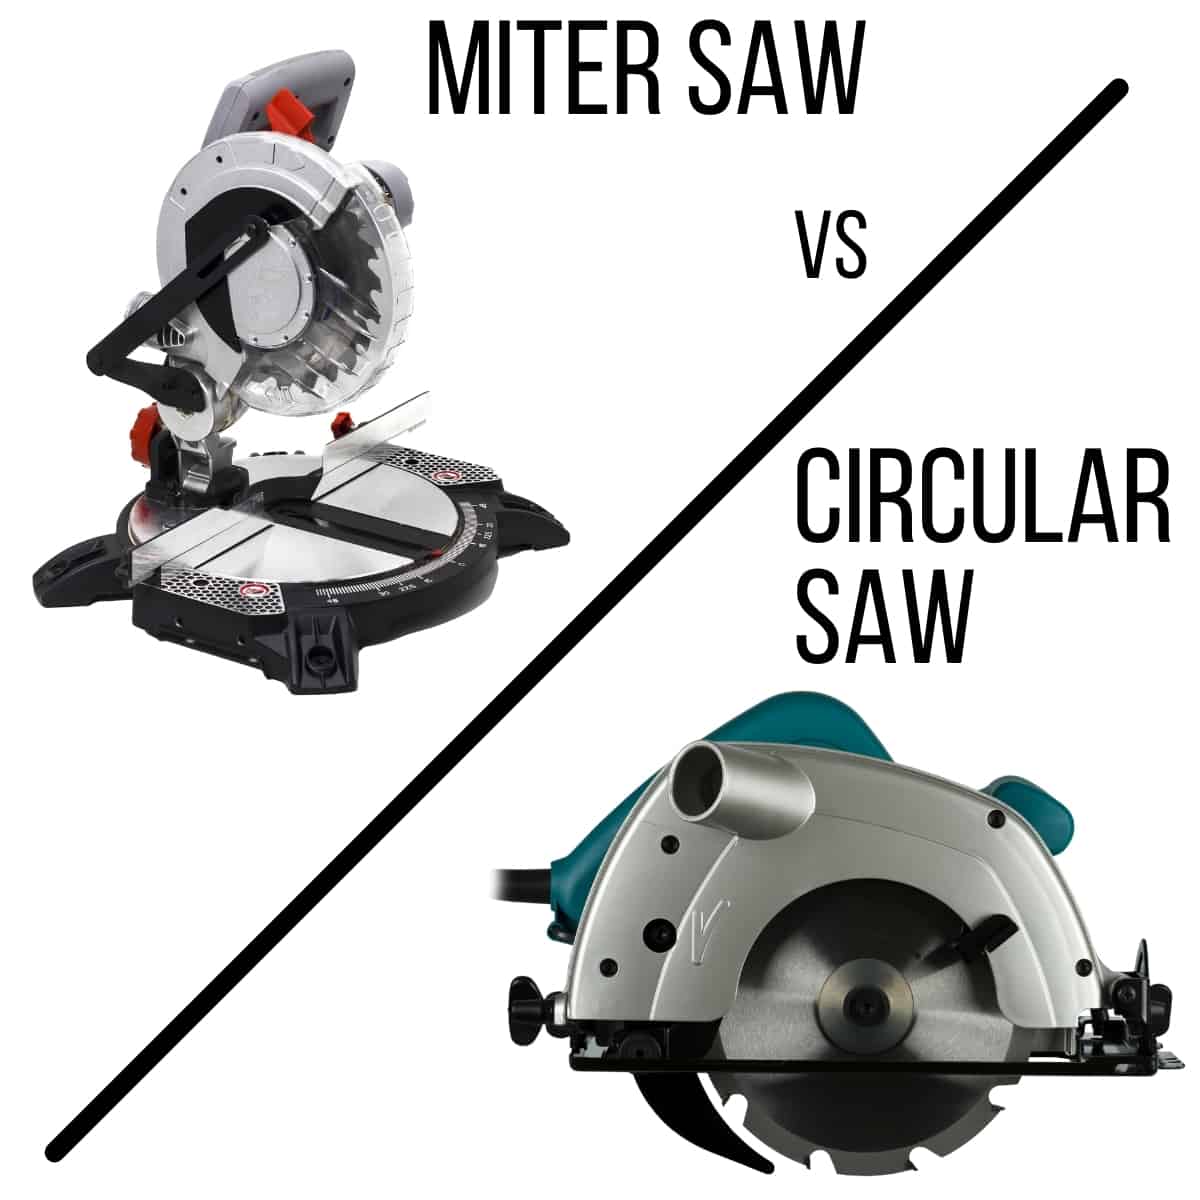
Quick comparison snapshot
- Miter saw vs circular saw: best for precision versus versatility.
- Use a miter saw when you need repeatable, accurate angle cuts.
- Use a circular saw when you need portable ripping and job-site flexibility.
- Choose both if you want a complete small-shop setup.

What is a miter saw?
A miter saw is a stationary tool.
It usually sits on a stand or bench.
You bring the workpiece to the blade.
It excels at crosscuts and angled cuts.
Common miter saw types:
- Compound miter saw: makes angled and beveled cuts.
- Sliding compound miter saw: adds extra cutting depth.
- Single-bevel miter saw: tilts only one direction.
Miter saws use preset fences and stops. That makes repeat cuts fast and accurate. They are the go-to for trim, molding, and frame work.

What is a circular saw?
A circular saw is handheld and portable.
You move the saw across a stationary workpiece.
It rips, crosscuts, and cuts sheet goods.
It’s common on job sites and for DIY work.
Circular saw features:
- Worm-drive or direct-drive motors.
- Adjustable shoe for cut depth and bevel.
- Compatible with many blade sizes and types.
A circular saw is simple to carry and set up. It’s a generalist tool for rough and fine cuts.

Key differences: miter saw vs circular saw
- Accuracy
- Miter saw: high. Good for precise angles and repeat cuts.
- Circular saw: moderate. Accuracy relies on guides or a steady hand.
- Cutting style
- Miter saw: crosscuts and miters.
- Circular saw: rips, crosscuts, and plunge cuts.
- Portability
- Miter saw: heavier and more fixed.
- Circular saw: very portable and easy to pair with a straightedge.
- Capacity
- Miter saw: limited by blade diameter and sliding feature.
- Circular saw: can cut long boards and sheets with guides.
- Setup time
- Miter saw: quick for repeat cuts once set.
- Circular saw: fast for ad-hoc cuts and odd locations.
- Cost
- Miter saw: higher initial cost for quality models.
- Circular saw: generally lower cost and lower entry barrier.

Practical use cases and examples
- Trim and molding
- Choose a miter saw for clean, accurate joints.
- Framing and decking
- Choose a circular saw for long rips and on-site cutting.
- Cabinet doors and picture frames
- A miter saw gives tight, repeatable cuts.
- Sheet goods like plywood
- Use a circular saw with a straightedge or track.
Real-life example from my shop:
- When building a bookcase, I used a miter saw for all shelf trim and a circular saw to rip plywood for the cabinet sides. The combo saved time and improved fit.
Performance: accuracy, speed, and finish
Accuracy
- Miter saw: precise bevels and miters with stops and detents.
- Circular saw: depends on guides, clamps, or jigs.
Speed
- Miter saw: fast for batch cuts.
- Circular saw: fast for single large panels or site work.
Finish
- Miter saw: cleaner, less tear-out when using finish blades.
- Circular saw: can produce more tear-out on plywood unless using a scoring blade or zero-clearance guide.
Tips to improve circular saw accuracy:
- Use a straightedge clamp guide.
- Score before cutting with a shallow pass.
- Use a blade designed for the material.
:max_bytes(150000):strip_icc()/SPR-miter-saw-vs-table-saw-8628214-hero-ec319f55ad644508aec341c001e6e4fd.jpg)
Safety and maintenance
Safety basics
- Always wear eye and ear protection.
- Keep hands away from the blade path.
- Use clamps or a fence to secure stock.
Miter saw safety tips
- Wait for blade to stop before lifting.
- Check bevel and miter detents for wear.
- Keep the dust port clear to avoid build-up.
Circular saw safety tips
- Use a riving knife or anti-kickback measures where possible.
- Control plunge starts to avoid binding.
- Inspect the cord or battery and guard before use.
Maintenance
- Sharpen or replace blades when dull.
- Clean sawdust from vents and rails.
- Check alignments regularly for accurate cuts.
How to choose: simple decision checklist
Ask yourself:
- Do I need repeatable, precise angle cuts? Choose a miter saw.
- Do I work on job sites with large sheet goods? Choose a circular saw.
- Is portability vital? Choose a circular saw.
- Is finish quality priority? Choose a miter saw for trim work.
- Is budget tight? A circular saw is more affordable to start.
If you can afford both, buy a miter saw for trim and a circular saw for sheets and ripping. A small workshop benefits from having both tools.
PAA-style questions:
Which saw is better for cutting baseboards?
For baseboards, a miter saw is better because it makes precise compound cuts and repeatable angles.
Can a circular saw replace a miter saw for trim?
A circular saw can do trim in a pinch, but it rarely matches the speed and accuracy of a miter saw for finish work.
:max_bytes(150000):strip_icc()/SPR-miter-saw-vs-table-saw-8628214-hero-ec319f55ad644508aec341c001e6e4fd.jpg)
Blades, accessories, and setup tips
Blades
- Use fine-tooth blades for finish and trim.
- Use ripping blades for long cuts and rough lumber.
- Consider a combination blade for mixed tasks.
Accessories
- Miter saw stand for mobility and stability.
- Track or straightedge guide for circular saw precision.
- Clamps, hold-downs, and feather boards for safety.
Setup tips
- Align fences and check squareness with a square.
- Use sacrificial backing to reduce tear-out on plywood.
- Mark and test cuts on scrap before final cuts.
Costs and buying recommendations
Budget basics
- Entry-level circular saws start low and work well for DIY.
- Quality miter saws cost more but pay off in speed and accuracy.
What to buy first
- Beginner on a budget: start with a circular saw and a guide.
- Focused on finish work: invest in a mid-range miter saw.
- Serious hobbyist or pro: get both, with a sliding miter saw and a corded or cordless circular saw.
Value tips
- Buy a good blade first; it changes cut quality more than the saw body.
- Look for features like laser guides, detent plates, and dust control.
Personal experience and lessons learned
I once tried to trim a room with only a circular saw. The joints were messy and slow. After adding a miter saw, my speed and accuracy improved dramatically.
Lessons I learned:
- Start with the saw that matches your main task.
- Buy the best blade you can afford.
- Practice safe setups and invest in simple jigs.
Real tip: label stops on your miter saw for common angles. It saves minutes and reduces errors.
Frequently Asked Questions of miter saw vs circular saw
Which is better for a beginner: miter saw or circular saw?
For beginners, a circular saw is cheaper and more versatile for many projects. A miter saw is easier for learning precise trim work.
Can I use a circular saw to make accurate miter cuts?
You can make miter cuts with a circular saw using a guide or jig, but a miter saw is faster and more precise for repeated angled cuts.
Is a sliding miter saw worth the extra cost?
If you cut wide boards or need greater crosscut capacity, a sliding miter saw is worth it. For narrow stock, a non-sliding model may suffice.
Are cordless versions of these saws reliable?
Cordless miter saws and circular saws can be reliable with modern batteries. Check battery run time and power rating for heavy tasks.
How often should I change blades on these saws?
Change blades when they dull or burn wood, typically after many hours of use. For heavy daily use, inspect blades weekly.
Can I use the same blades for both saws?
Some blades fit both tools, but blade size and arbor may differ. Match blade type to the material and saw specifications.
Conclusion
Both tools have clear roles. Miter saws win for precise trim, repeated angles, and a clean finish. Circular saws win for portability, ripping, and cutting large sheets on site. Choose based on your projects, or invest in both for a flexible workshop.
Takeaway: match the saw to the job, buy a quality blade, and practice safe setups. Try one small project first with your chosen tool to build confidence. Share your experience below or subscribe for more tool guides and tips.